
X27 Controller: SimHub Plugin Setup Guide
The X27 Controller SimHub plugin lets SimHub drive real analog gauges built with X27.168 stepper motors, without SimDash. Each X27 Controller drives up to 4 gauges, and you can connect several controllers at the same time. The plugin works with every game supported by SimHub.
1. Download the plugin
Download User.X27Controller.zip.
2. Copy User.X27Controller.dll into the SimHub folder
Close SimHub, then copy User.X27Controller.dll into the SimHub installation folder
(C:\Program Files (x86)\SimHub\,
unless you installed SimHub somewhere else).
Windows may ask for administrator permission to copy into this folder: click Continue.
3. Start SimHub and enable the plugin
Start SimHub. It detects the new plugin and asks whether to enable it. Switch on the X27 Controller plugin (the switch on the right, which may start switched off), and leave Show in left main menu on, then click Ok.
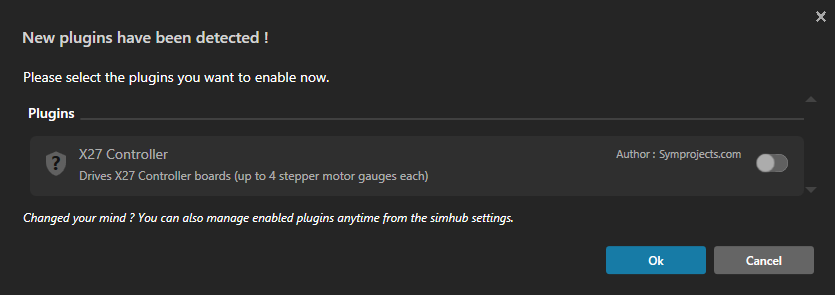
SimHub asks to enable the new plugin: switch it on and click Ok (click the picture to enlarge).
If you clicked Cancel by mistake, you can enable the plugin later from SimHub's Settings.
A controller must be driven by one program only. If SimDash keeps running alongside SimHub, for example because it controls other devices, disable the X27 Controller plugin in SimDash. Otherwise SimDash and SimHub will both move the needles.
4. Configure your controllers and gauges
Click X27 Controller in SimHub's left menu. Every X27 Controller you plug in appears automatically in the list at the top, with a green dot when it is connected. Select a controller to configure it and its 4 gauges.
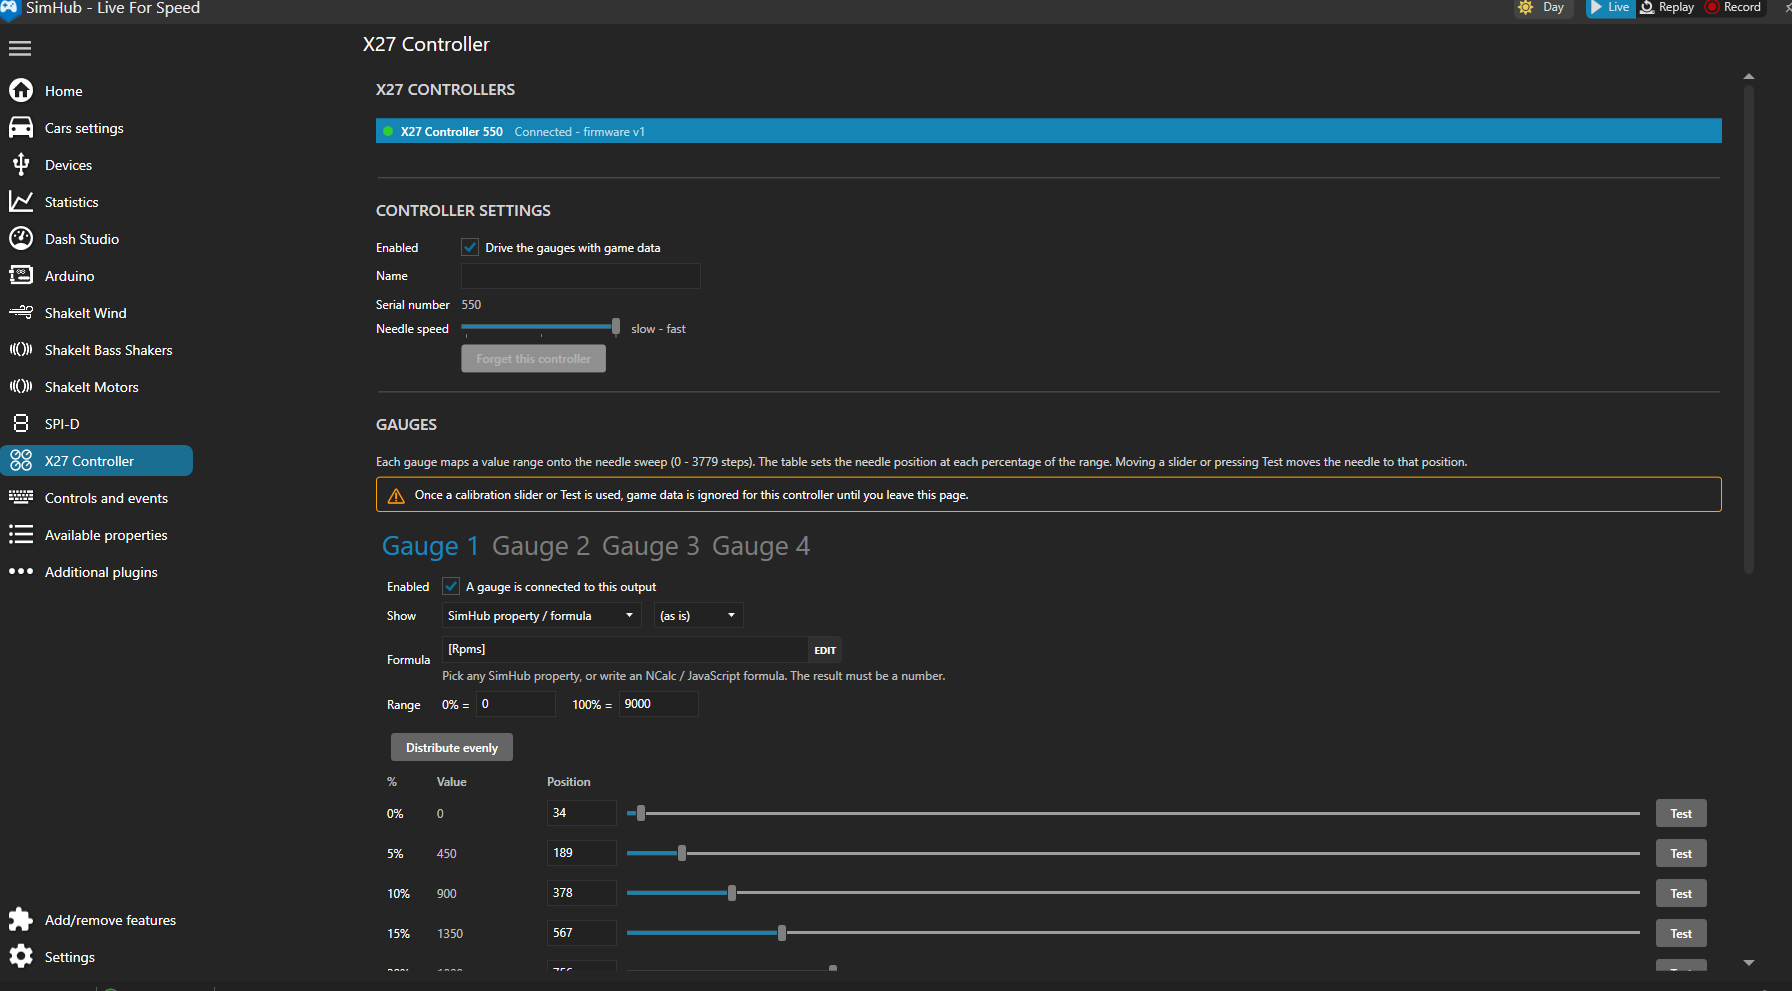
The X27 Controller configuration screen (click the picture to enlarge).
If you have used the X27 Controller with SimDash, you will find the same options: needle speed, displayed value and unit, value range and the 21-point needle calibration. In addition, each gauge can show any SimHub property or the result of an NCalc or JavaScript expression.
Controller settings
- Enabled: when ticked, the gauges follow the game. When unticked, the needles stay at their 0% position.
- Name: give the controller a name, useful when you have more than one.
- Serial number: identifies the controller. Each controller keeps its own settings.
- Needle speed: how fast the needles accelerate and move, from slow to fast.
- Forget this controller: removes a controller you no longer use from the list (available only while it is unplugged).
Gauge settings (one tab per gauge)
- Enabled: tick it for every output that has a gauge connected. A gauge that is not enabled is never moved.
- Show: the value displayed by the gauge, and its unit in the second list: RPM, speed (km/h or mph), fuel level (litres or gallons), fuel level %, water and oil temperature (°C or °F), oil and turbo pressure (bar, psi or kPa), throttle, brake, clutch, or SimHub property / formula. The plugin converts the game's values to the unit you choose.
- Range: the value at the start of the scale (0%) and at its end (100%), in the chosen unit. For example 0 and 9000 for a rev counter, or 0 and 260 for a speedometer.
When no game is running, the needles of enabled gauges return to their 0% position.
Showing a SimHub property or an NCalc expression
Choose SimHub property / formula in the Show list, then click EDIT. SimHub opens its own property picker, the same one used in Dash Studio. You can:
- pick any property from the list, including game-specific values (for example AdBlue level, brake air pressure or battery voltage in truck simulators) and properties provided by other plugins;
- write an NCalc expression, for example:
[DataCorePlugin.GameData.Rpms]
[DataCorePlugin.GameData.SpeedKmh] * 1.1
if([DataCorePlugin.GameData.Gear] = 'N', 0, [DataCorePlugin.GameData.Rpms]) - or switch the editor to JavaScript.
The result must be a number. It is placed on the scale using the Range and the calibration table, like any other value.
5. Calibrate the needles
Every gauge face is different, so each gauge has a calibration table that tells the plugin where the needle must point for 21 values: 0%, 5%, 10% ... 100% of the Range. The Value column shows the value each row stands for (with a Range of 0 to 9000: 0, 450, 900, 1350 ...), and Position is the needle position for that value, from 0 to 3779 steps (the full sweep of the motor). Between two rows the needle moves proportionally.
As soon as you move a calibration slider or press a Test button, the plugin stops reacting to the game's data for that controller, so the needles stay where you put them. The gauges follow the game again when you leave the X27 Controller page in SimHub.
- Slider: drag it and the needle moves at the same time, so you can watch the gauge and stop when the needle points exactly at the mark for that row's value. The position is saved automatically.
- Position box: type a position (0 to 3779) for fine adjustments, then press Enter.
- Test: moves the needle to the position of that row. Use it to check a value already calibrated, or to see a position you typed.
- Distribute evenly: keeps the 0% and 100% positions and spreads all the rows in between evenly. Ideal for gauges with an evenly spaced scale.
The positions must all go up, or all go down (for gauges that turn the other way). If they don't, a warning appears under the Range.
Quick calibration
- Stop the game, choose what the gauge shows and set the Range.
- Drag the 0% slider until the needle points at the start of the scale.
- Drag the 100% slider until the needle points at the end of the scale.
- Press Distribute evenly.
- Check a few rows with Test, and adjust with the slider any row where the needle misses its mark (common on gauges with an uneven scale).
- Leave the page: the gauges follow the game again.