
JC-LED 7-Segment Display Controller: SimHub Plugin Setup Guide
The JC-LED SimHub plugin lets SimHub drive your 7-segment displays and LEDs directly, without SimDash. A JC-LED controller has 4 banks of 16 displays: up to 64 digits showing speed, RPM, gear, lap times, gaps, fuel, temperatures, flags and much more. The plugin works with every game supported by SimHub.
1. Download the plugin
Download User.JcLed.zip.
2. Copy User.JcLed.dll into the SimHub folder
Close SimHub, then copy User.JcLed.dll into the SimHub installation folder
(C:\Program Files (x86)\SimHub\,
unless you installed SimHub somewhere else).
Windows may ask for administrator permission to copy into this folder: click Continue.
3. Start SimHub and enable the plugin
Start SimHub. It detects the new plugin and asks whether to enable it. Switch on the JC-LED Controller plugin (the switch on the right, which may start switched off), and leave Show in left main menu on, then click Ok.
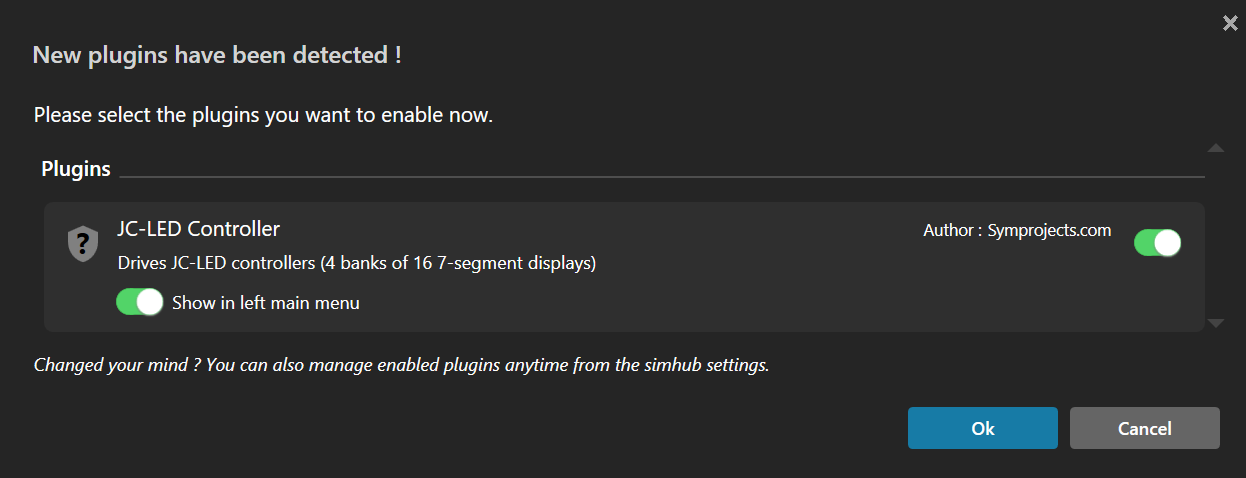
SimHub asks to enable the new plugin: switch it on and click Ok (click the picture to enlarge).
If you clicked Cancel by mistake, you can enable the plugin later from SimHub's Settings.
A controller must be driven by one program only. If SimDash keeps running alongside SimHub, for example because it controls other devices, disable the JC-LED plugin in SimDash. Otherwise SimDash and SimHub will both write to the displays.
4. Configure the controller
Click JC-LED in SimHub's left menu. The JC-LED controller appears automatically in the list at the top, with a green dot when it is connected. Select it to configure it.
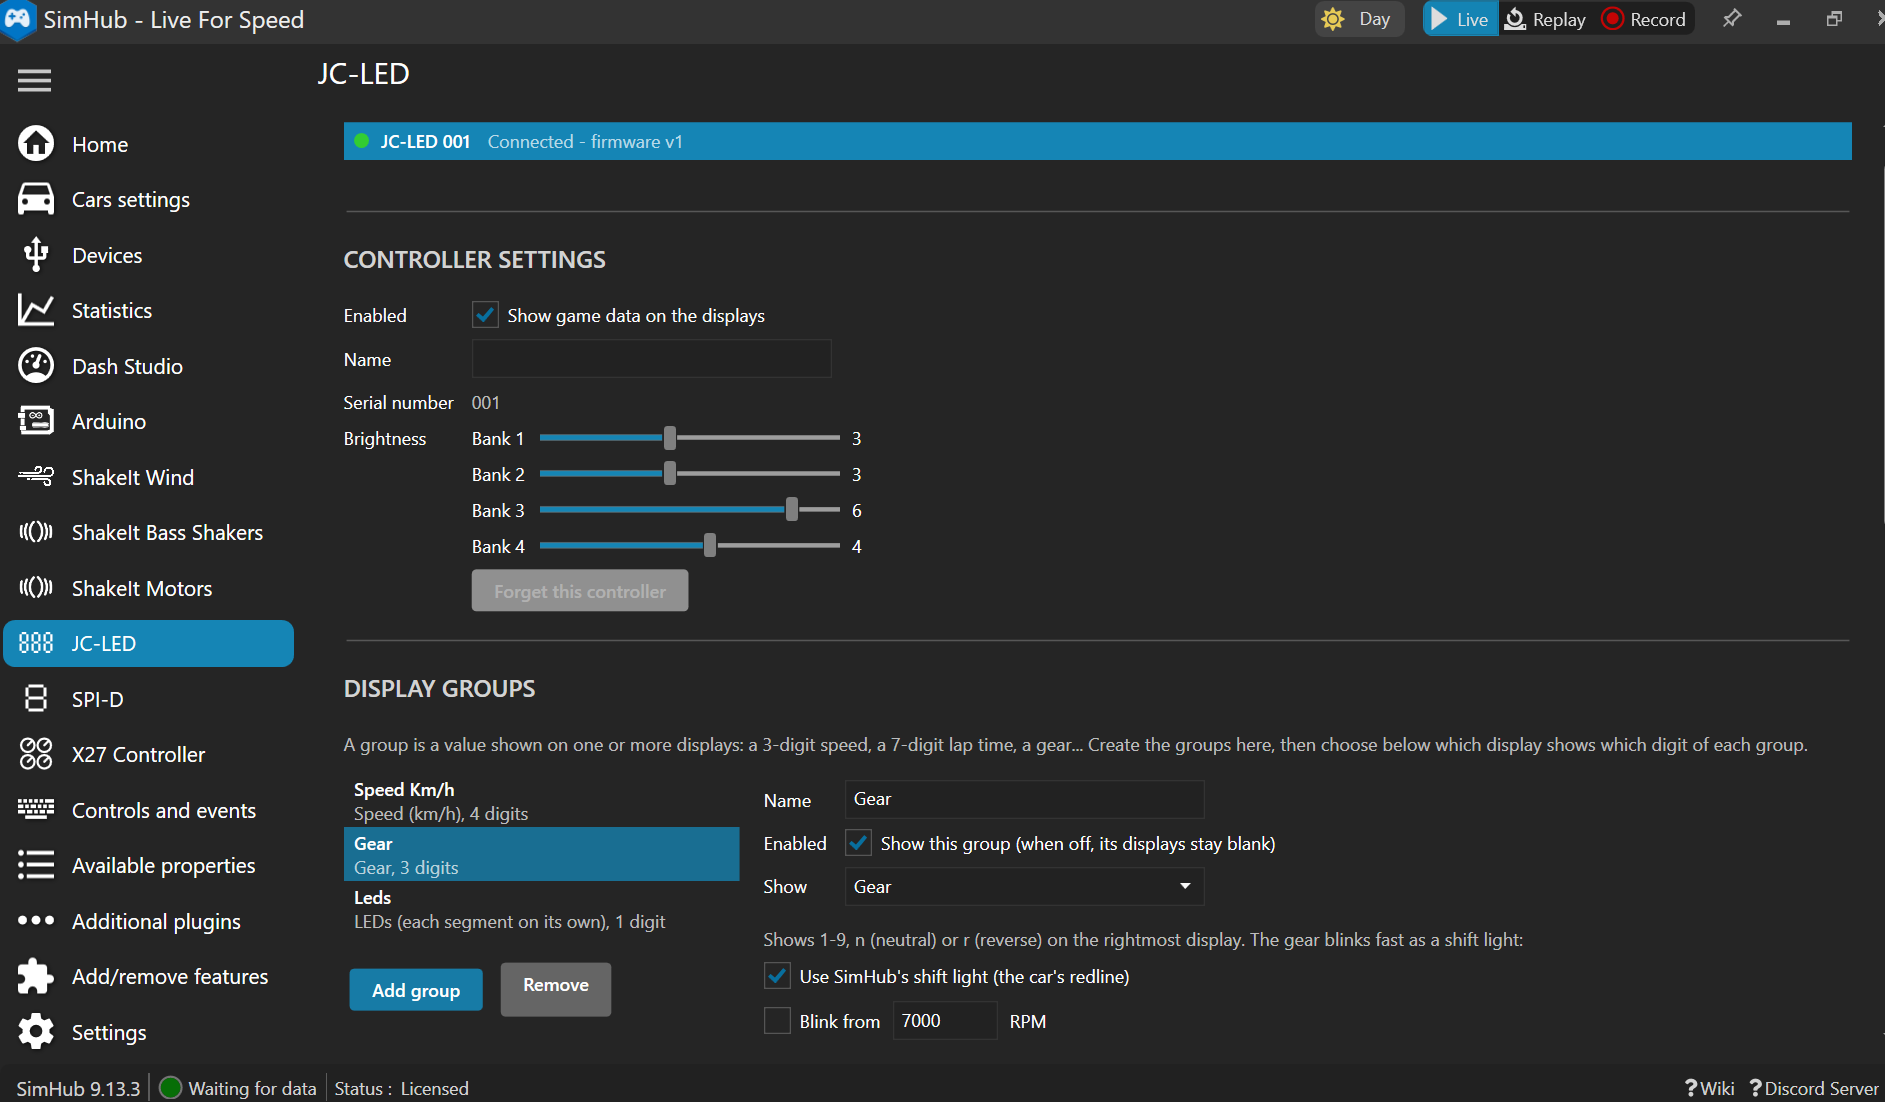
Controller settings and display groups (click the picture to enlarge).
If you have used the JC-LED with SimDash, you will find the same display groups and options. In addition, a group or an LED can show any SimHub property or the result of an NCalc or JavaScript expression.
Controller settings
- Enabled: when ticked, the displays show the game data. When unticked, they stay blank.
- Name: give the controller a name of your choice.
- Serial number: identifies the controller.
- Brightness: one slider for each of the 4 banks, from 0 to 7. When you move a slider, all the displays of that bank light up (every segment on) for 3 seconds, so you can judge the new brightness on your panel.
- Forget this controller: removes a controller you no longer use from the list (available only while it is unplugged).
When no game is running, the displays are blank.
5. Create the display groups
A display group is one value shown on one or more displays (digits). For example:
- a speed on 3 displays:
123; - the gear on 1 display:
4,norr; - a lap time on 7 displays:
01.23.456; - the fuel level with one decimal on 3 displays:
45.2.
You first create the groups (what to show and how), then, in the next step, you choose which physical display shows which digit of each group. Click Add group to create a group, select it in the list to change it, and click Remove to delete it. Each group has:
- Name: a name of your choice, shown in the display list.
- Enabled: when unticked, the displays of the group stay blank.
- Show: the value to display, grouped by category (car, engine, race, times, tyres, flags...), and its unit when the value has one (km/h or mph, litres or gallons, °C or °F, bar, psi or kPa...). The plugin converts the game's values to the unit you choose.
The other options depend on the value shown:
- Numbers (speed, RPM, fuel, temperatures, pressures, position, laps...): number of integer and decimal digits, decimal point, leading zeros, and blinking (slow, medium or fast), always or when the value is above or below a limit. For example, make the fuel level blink fast when it drops below 5 litres.
- Gear: shows 1-9, n (neutral) or r (reverse) on the rightmost display, and can blink fast as a
shift light: at SimHub's shift light (the car's redline), from a given RPM, or from a percentage of the maximum RPM.
You can stop it blinking from a given gear up. For trucks, a truck gearbox option lets you choose the text
shown for each gear (up to 3 characters, for example
L1orC12). - Lap times (current, last, best, sector): format mm.ss, mm.ss.t or mm.ss.ttt. After crossing the line, the completed lap time stays on the displays for 4 seconds.
- Gaps (to the leader, the car ahead, the car behind) and deltas (to the session best or all-time best lap), on 6 displays.
- For times, gaps and deltas you also choose what to show when there is no time: blank, dashes or zeros.
- LEDs: see below.
Under the options, the plugin tells you how many displays the group uses.
Showing a SimHub property or an NCalc expression
Choose SimHub property / formula in the Show list, then click EDIT. SimHub opens its own property picker, the same one used in Dash Studio. You can:
- pick any property from the list, including game-specific values (for example AdBlue level, brake air pressure or battery voltage in truck simulators) and properties provided by other plugins;
- write an NCalc expression, for example:
[DataCorePlugin.GameData.Rpms] / 100
[DataCorePlugin.GameData.WaterTemperature] * 1.8 + 32
if([DataCorePlugin.GameData.PitLimiterOn], 'PIT', [DataCorePlugin.GameData.SpeedKmh]) - or switch the editor to JavaScript.
A number is shown with the group's digit settings (integer and decimal digits, leading zeros, blinking).
A text (for example PIT,
-- or
1.5) is shown as it is, aligned to the right.
Using LEDs instead of 7-segment displays
A JC-LED output does not have to drive a 7-segment display: you can connect up to 8 single LEDs instead, for example with the 8 LEDs display for JC-LED. Each LED takes the place of one segment of the display:
| Segment | A | B | C | D | E | F | G | DP |
|---|---|---|---|---|---|---|---|---|
| LED | 1 | 2 | 3 | 4 | 5 | 6 | 7 | 8 |
To drive them, create a group and choose LEDs (each segment on its own) in the Show list. The group uses 1 display, and each of the 8 segments (A to G and the decimal point, DP) gets its own settings:
- On / off values: flags (green, yellow, blue, white, black, checkered...), ABS, traction control, pit limiter, DRS, turn indicators, hazard lights, handbrake, low fuel, shift light and more. The LED is on when the value is on, or off with the invert option.
- Numbers (RPM, speed, fuel, temperatures...) and SimHub properties / formulas: the LED is on when the value meets a condition, for example RPM above 7000, or water temperature above 105 °C. A formula returning true counts as 1.
- Blinking: while the LED is on, it can blink slow, medium or fast, always or when the value meets a condition. For example, an LED lit from 6000 RPM that blinks fast from 7500 RPM.
With 8 LEDs on each output, a single controller can drive dozens of warning lights, shift lights or flag indicators, and you can mix 7-segment displays and LEDs on the same controller.
6. Assign the displays
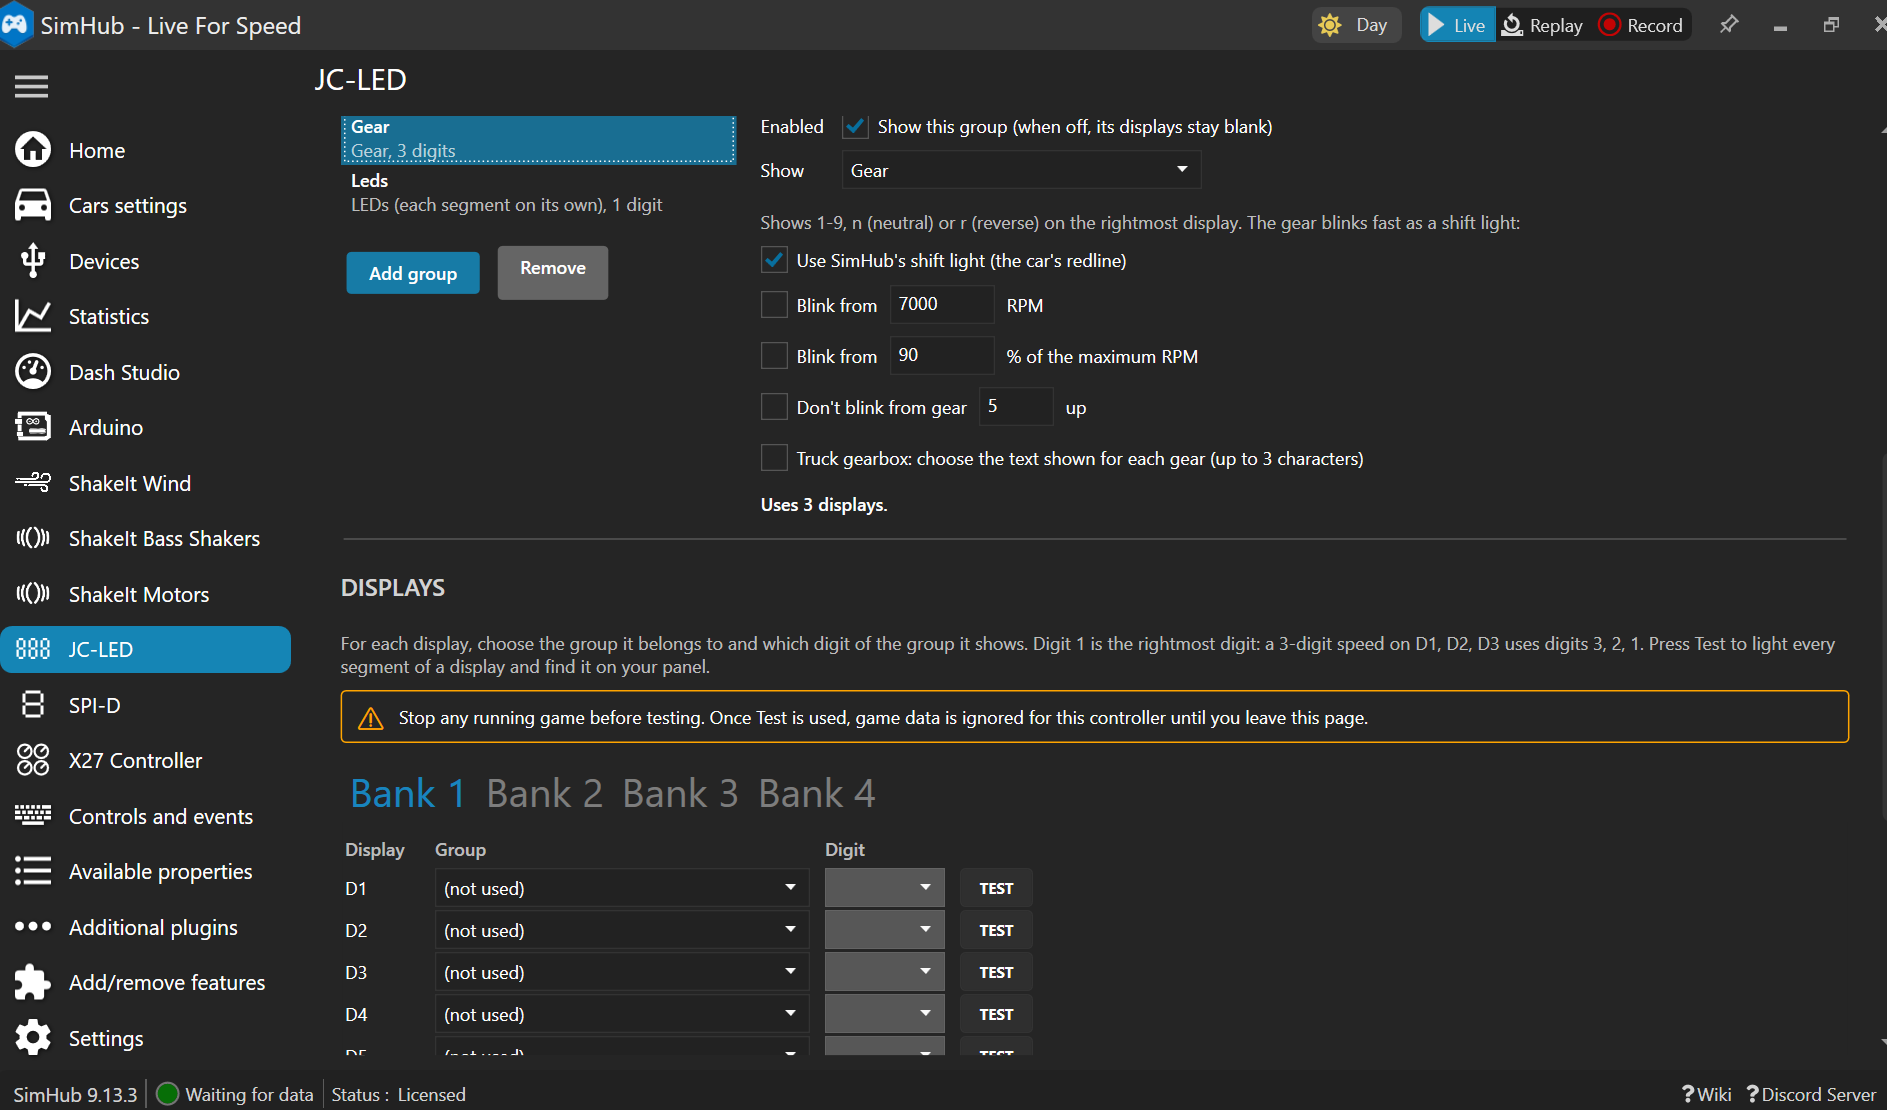
Gear options and the display list, one tab per bank (click the picture to enlarge).
The Displays section has one tab per bank (Bank 1 to Bank 4), and each tab lists its 16 displays, D1 to D16. For each display you use, choose:
- Group: the group the display belongs to, or (not used) to keep it blank.
- Digit: which digit of the group it shows. Digit 1 is the rightmost digit. For example, a 3-digit speed on D1, D2 and D3 (left to right) uses digits 3, 2 and 1.
- Test: lights every segment of that display, so you can find it on your panel.
Once you press a Test button, the plugin ignores the game's data for that controller, so the tested display stays lit. The displays follow the game again when you leave the JC-LED page in SimHub.
Quick start
- Stop the game and open the JC-LED page.
- Press Test on each display to find where it is on your panel.
- Click Add group, name it "Speed", choose Speed in km/h with 3 integer digits.
- In the Displays section, set the 3 speed displays to the "Speed" group, with digits 3, 2 and 1 from left to right.
- Repeat for the gear, lap time and any other value you want to show.
- Adjust the brightness of each bank, leave the page and start the game.